I think you could say that my husband is addicted to pesto. Of course, I never cease to remind him that when we first started dating he wouldn't even try it. Green stuff on pasta? Gross! But then one night I finally convinced him to try a little bite. Then he tried another... and now it's all I can do to keep him from eating it by the spoonful before dinner.
In the spring I buy one of those small pots of organic basil that the grocery store expects people to use in their kitchens. The greatest thing about these pots of kitchen herbs, is that they're filled with a dozen or more seedlings. So, rather than spend $1.99 (minimum) per tiny basil plant at a nursery, I spend $1.99 for anywhere from 12 to 20 healthy, organic seedlings. I plant them outside, and by July I have my own little basil forest. The price savings is really inconsequential when you factor in the expense of the pine nuts, cheese, and olive oil, but I can't see the point in spending $20 on plants when you could just spend $2.
There are many pesto variations, of course, but there are two that stick out most in my mind. The best pesto I ever remember having was in a restaurant on the way to Vermont one summer. I wish that I knew the name of the restaurant, but unfortunately, I don't even know the name of the town. It was from them that I learned to keep some of the pine nuts whole. The second best pesto was an electric green batch that I made when we were living in our first apartment together. That year, I grew the basil on the fire escape. I have no idea what caused the color of the pesto to be so lime green, but it was the best batch I ever made, and I haven't been able to replicate it since.
I never make it the same way twice, and a lot depends on small adjustments for taste, but I've finally written down my recipe for pesto (I had to remind myself to measure). I make multiple huge batches of pesto every summer and freeze it for winter consumption. We eat pesto on pasta, in risotto, on paninis, on salad, and in cold pasta salads. It's pretty versatile, and it's always an easy go-to meal. This recipe will make about 4 cups of pesto; I normally double it.
J'adore: Pesto
Ingredients:
6 medium cloves of garlic
8 oz. pine nuts
3 cups basil leaves
1 cup parsley leaves
2 cups grated cheese (I use a parmesan/romano blend)
1/2 to 1 cup olive oil
sea salt
Directions:
Peel each of the garlic cloves and mince in a food processor. Scrape down the sides and pulse again. Add 7 to 7.5 ounces of the pine nuts and blend until the garlic and nuts make a think, chunky paste. Rinse and spin/dry the basil leaves and parsley. Add three cups of packed basil leaves, one cup of packed parsley, 2 cups of grated cheese, and at least 1/2 a cup of oil to the food processor. Blend until all of the leaves are finely chopped. Add oil to thin to desired consistency. Add a pinch or two of sea salt, if desired. Stir in the remaining whole pine nuts.
Serve with pasta or any way you like!
Notes:
*It's best to harvest the basil early in the morning before the sun gets too hot. Making pesto on a rainy day is another safe bet. The flavor and color tend to be better this way.
*The parsley helps to keep the basil and pesto from turning brown.
*Freezes well, just sit out or in the refrigerator to thaw.
*If storing in the fridge, it will last better with a bit of extra olive oil.
*If you are microwaving, microwave the pasta first, then mix in the pesto. Although pesto tastes great on already heated foods, it does not taste-- or look-- so great when it is heated directly in a microwave or pot.
*It would be easier to just throw everything in the food processor and press the on button, but then you end up with big chunks of garlic unevenly spread throughout the pesto. In my experience, it's most important to blend the garlic first, then the nuts, and then everything else. This is also the reason that I use so much garlic right from the start. You can always tone it down by adding more pine nuts, cheese, basil, or parsley, according to your taste preferences, but it's hard to add more garlic after the fact.
Monday, August 23, 2010
Monday, August 16, 2010
Spanish Rice
This Spanish rice turned out GREAT! Much better than I expected. We ate it with enchiladas, and it made them taste even better.
J'adore: Easy Spanish Rice
Ingredients:
1 onion, diced
olive oil
1/2 cup brown rice
1 can vegetable broth
1/3 jar (approx. 4 oz.) salsa (I used Trader Joe's Double Roasted Salsa)
Directions:
Saute the diced onion in olive oil in a sauce pot. When onions are cooked, add 1/2 cup rinsed brown rice. Saute for another minute or two. Add vegetable broth, bring to a boil, reduce to a simmer, cover, and simmer until liquid is absorbed and rice is tender. When rice is cooked, stir in the salsa.
Wednesday, August 4, 2010
Jammin'
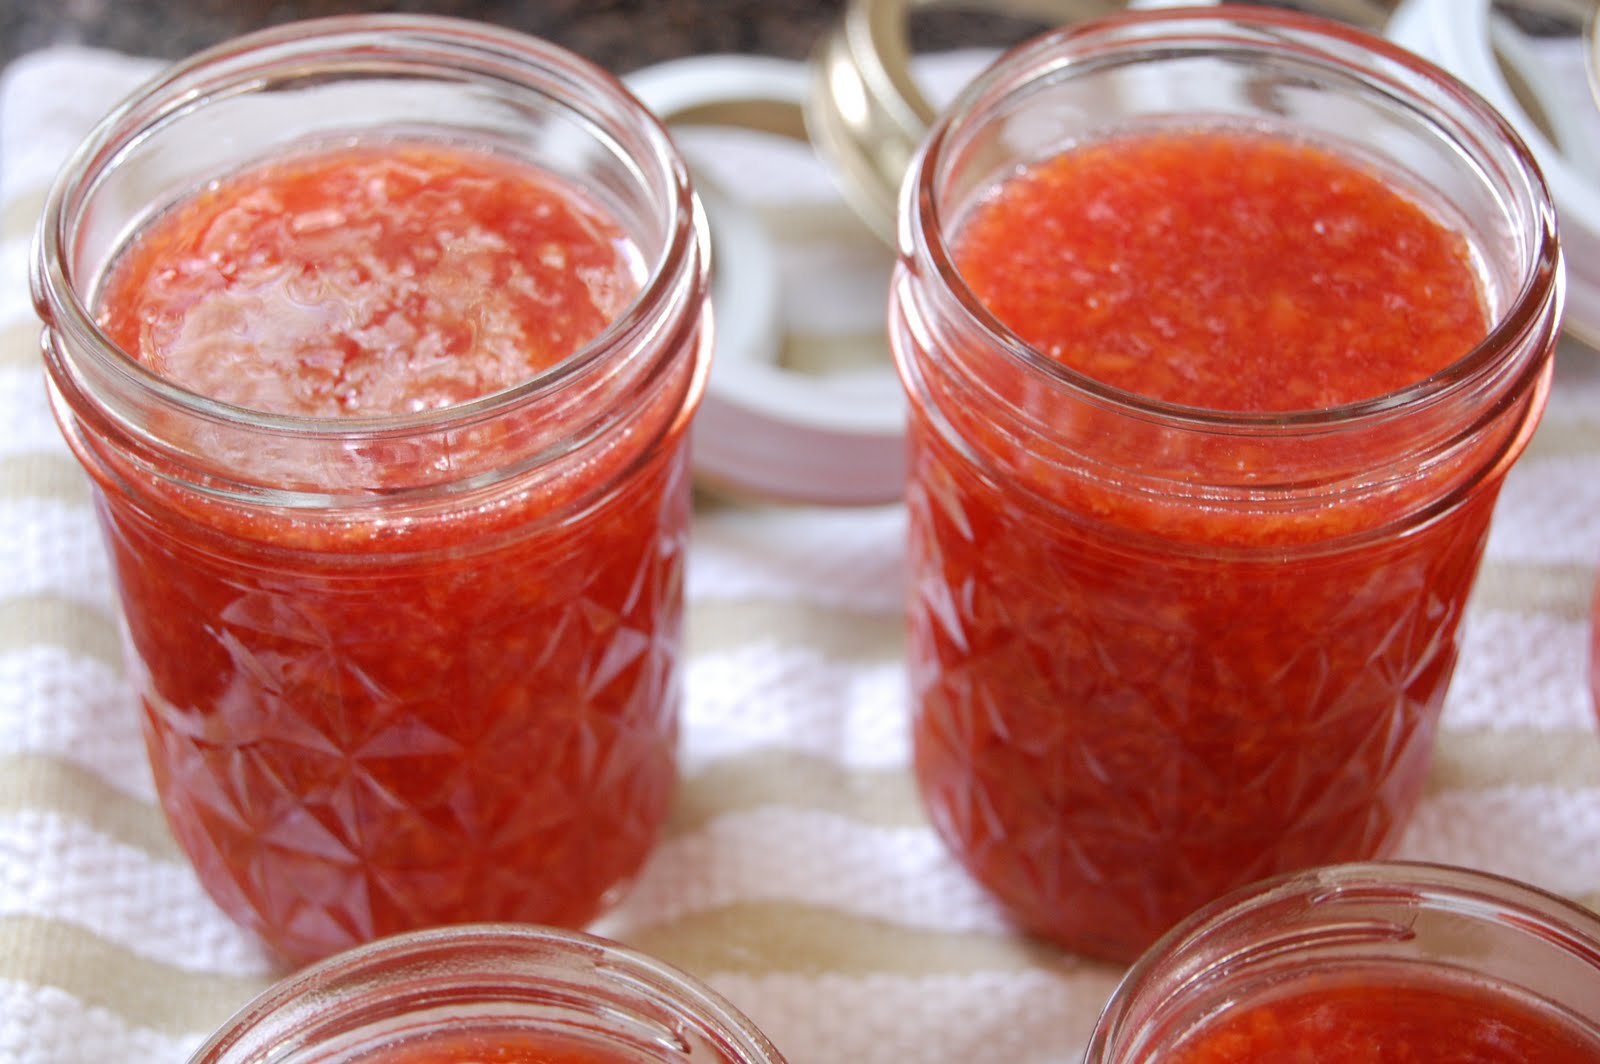 My mom used to make jam for us when I was growing up. It was always more flavorful than the store-bought stuff, plus it was a great way to use up fruits that we picked from out back yard and our CSA. I tend to get a little manic about making jam, but we always use it, and we give a number of jars away to appreciative friends and family members. My husband will pretty much only eat homemade strawberry jam now, so in the spring we make a pilgrimage to an absolutely amazing strawberry farm in New Jersey. It's a bit of a drive, but it's well worth the trek-- they really have the best berries. I always buy at least 10 quarts of strawberries (despite the dirty looks we get from the people behind us in line), and when we get home at the end of the day, we wash them, hull them, and throw them in the food processor. Ball's directions says not to do this, but I've been doing it for years without a problem. After I've pulsed the berries down to the consistency we like (no slimy chunks), I divide the purée into 5 cup increments (either in containers, labeled at the top with permanent marker, or in seal-a-meal type bags that I double bag and then stick into thick gallon-size freezer bags). By doing this, I can stick all of the fresh fruit right into the freezer and don't have to worry about canning it immediately, and I've saved myself an important step later on. I do the same for sour cherries and blackberries when they're in season, although the increments are different.
When you buy the Ball No Sugar Needed Fruit Pectin, there are tons of recipes,
 pictures, and all of the directions you'll need inside. I more or less follow all of their directions... except that I NEVER add the juice or water that all of their recipes call for. I found that the few times I mistakenly did add the extra liquid that the jams never jelled properly. Some people use Sure-Jell, but I always stick to Ball (whose website stinks, hence the lack of hyperlink).
J'adore: Homemade Jam

Ingredients for Strawberry jam:
5 cups mashed or puréed strawberries**
1 packet Ball Fruit Jell No Sugar Needed Pectin
1.5-2 cups granulated sugar*
Ingredients for Sour Cherry jam:
4 cups chopped and pitted sour cherries
1 packet Ball Fruit Jell No Sugar Needed Pectin

2 cups granulated sugar*
Ingredients for Berry Berry Cherry jam:
2 cups blackberry juice
2 cups mashed or puréed strawberries
2 cups chopped and pitted sour cherries
1 packet Ball Fruit Jell No Sugar Needed Pectin
2 cups granulated sugar*

Directions:
1. Fill a large canning pot with hot water and bring to a boil. Clean jelly jars, lids, and bands with warm soapy water. (I'd recommend 8 8oz. jars to be on the safe side. Although most of the recipes only make around 6 jars, you don't want to end up short, especially if you've added all 3 cups of sugar). Put the clean jars in the canning pot and boil/simmer for at least ten minutes with the lid on. Place the lids in a small pot and boil/simmer for at least ten minutes. Put the bands aside where they will be easy to access.
2. Pour fruit purée into a large cooking pot and turn heat to med-low. Bring fruit to a simmer. Sprinkle the pectin in a little at a time, so as to avoid chunks, stirring constantly. Bring mixture to a full boil, stirring constantly. Once mixture is boiling it is time to add sugar. Start with one cup, stir in completely, and taste to see if it's sweet enough. Continue adding sugar until the desired sweetness has been achieved, but no more than three cups. Bring mixture to a boil again. Boil for one full minute, stirring constantly.
3. Remove from heat and skim foam, if necessary.
4. Remove hot jars from canning pot and turn upside-down onto a clean dishtowel.
5. Ladle hot jam into hot jars leaving 1/4 inch headspace (to the bottom of the jar's threads). Wipe the threads and rim clean if you spill any jam. Place a lid onto the jar and secure by tightening the band onto the jar. Place full jars back into the boiling canning pot, making sure that the jars are covered by at least 2 inches of water.
6. Process jars in the boiling water for 10 minutes with the lid on.
7. Carefully remove the jars from the boiling water and place on a clean dishtowel. When all of the jars have been placed on the towel, cover them lightly with another clean dishtowel.
8. Listen for the jars' lids to pop. Usually this will only take an hour or two, but it can take up to 24 hours for all the lids to pop. You'll know that a lid has created a seal when the center of the lid is concave. DO NOT press on the lids if they have not sealed on their own! If, after 24 hours, your jars still haven't sealed, just stick them in the fridge.
9. Label sealed jars and store in a cool, dry, dark place. Jam will keep for about a year, if you have it around that long!
*You can use anywhere from no sugar to 3 cups of sugar depending on your personal preference and depending on the batch of fruit you're using. I always use at least one cup of sugar and then add more based on taste. Do not add more than 3 cups of sugar.
**9 quarts of fresh strawberries makes 3 batches of jam: 18 8oz. jars, 4 4oz. jars; 2 quarts makes approx. 5 cups of purée .
Subscribe to:
Posts (Atom)